In this installment of Quilting 101, we walk you through the process of adding quilt binding to finish your quilt using your sewing machine.
Written by Jeanne O'halleran.
I love all aspects of the quilting, except maybe binding my quilts. I’m think it’s mostly because I’m too excited to get the quilt finished as quickly as possible and start my next project. So, unless the quilt is going to be entered into a competition, all my bindings are done completely by machine. It is so much faster than attaching by hand and looks just as beautiful. Here’s how:
Step One: Calculate How Much Binding You Need
You need to measure your quilt to figure out how long your total binding needs to be. *Tip: DO NOT assume you already your quilt measurements, because the size of your quilt can change a little as you work with it. It’s always good to get fresh measurements with every step.
Length of Quilt ___ + Width of Quilt = ___ x2 = ____
This is the total length of binding that you will need for your quilt. I always add about ten extra inches just in case.*Tip: Don’t forget to multiply by two.
Step Two: Cut Binding Strips
To calculate the number of strips you will need, divide the total length of binding you calculated above by the width of your binding fabric (WOF).
Cut your binding strips 2 ½ inches wide x WOF.
You then need to join the strips together into one long binding strip.
- Put the end of one strip horizontally in front of you, right side up.
-
Place another strip on top of it, wrong side up, 90-degrees to the first strip (See Photo 1).

-
Imagine a square where the two strips overlap and mark a diagonal line from the top left to the bottom right of that square. Pin on either side of the line. (see Photo 2)

- Stitch along the line you marked.
- Repeat for all the binding pieces, paying close attention to match all the right sides together.
*Tip: If you are using a solid fabric or other double-sided fabric, like a batik, it helps to mark the right side and then double check that you are matching “right sides” together as you stitch each piece. This can help avoid a lot of unstitching. Just ask me how I know
Step Three: Press the Binding
For each join in the binding, press the seam while it is closed, trim the excess of the seam to ¼ inch, then press the seam to one side. Repeat for all seams.
Press the entire length of the binding in half, wrong sides together. This will give you a finished binding width of 1 ¼” width.*TIP: Be careful not to pull on the binding while you are pressing, because you can stretch it.
Step Four: Pin/Clip to front of quilt (Optional)
Note: This step if optional. You can simply attach the binding without pinning/ clipping it to the quilt first.
Starting in the middle of one of the sides, leave about 6-10 inches of binding loose, then start pinning or clipping the binding to the edge of the quilting, matching the raw edges of the binding to the raw edge of the quilt.
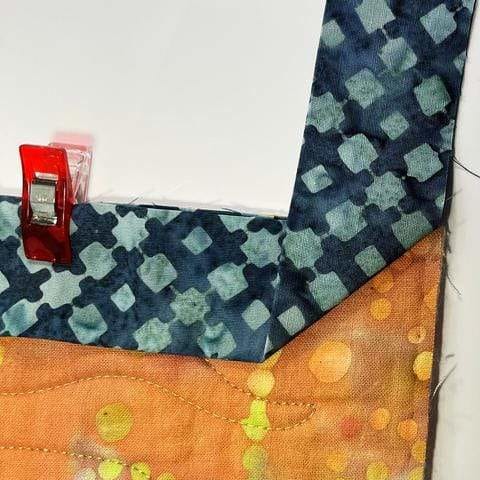
Turning the corner: When you get the first corner, fold the binding strip up so that it makes a 45-degree angle and extended up from the edge of the next side of the quilt. (see Photo 3)
Then, keeping that fold in place, fold the strip down so that there is a fold even with the edge of the quilt and the strip is even with the next side of the quilt. (see Photo 4).

Continue pinning/clipping down the side of the quilt and repeat at each corner.
Step Five: Attaching the Binding
This is a great time to use your ¼” footon your machine to ensure you have an even width around your entire quilt. Starting in the middle of one of the sides, leave about 6-10 inches of binding loose, stitch the raw edges of the binding to the raw edge of the quilt.
Turning the corner: When you get the first corner, fold the binding strip up so that it makes a 45-degree angle and extends up from the edge of the next side of the quilt. (see Photo 5).
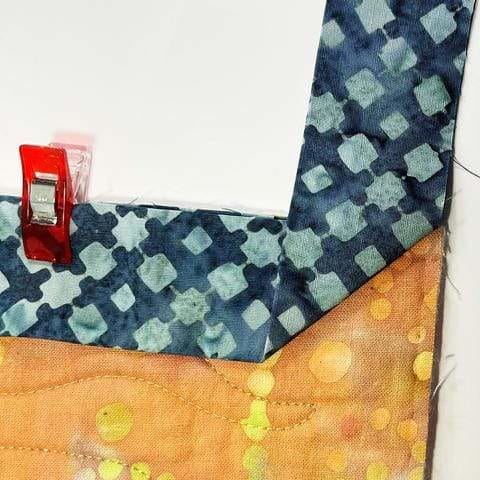
Then, keeping that fold in place, fold the strip down so that there is a fold even with the edge of the quilt and the strip is even with the next side of the quilt. (see Photo 6).

Continue stitching down the next side of the quilt.
Here is a video of attaching the binding to the front of the quilt, complete some additional tips and tricks for attaching binding to your quilt and getting those mitered corners:
Joining the Ends of the Binding: When you stitch around to the beginning side, stop about 10-12 inches from where you began and remove from your sewing machine.
- Lay the beginning edge flat along the raw edge of the quilt
-
Match the end of the binding strip to the raw edge of the beginning of the binding strip and fold over the excess (See Photo 7)

- Measure 2 ½ inches from the fold and cut off the excess
- Match up the raw ends, right sides together, at 90-degree angles, the same way you joined the other binding strips, and stitch from corner (see Photo 8)

- Trim the excess from the seam and press the seam
- Match the raw edge of the binding the raw edge of the quilt and finish stitching to the quilt
Here is a video of attaching the beginning and end of the binding on the front of the quilt:
Step Six: Attaching to the Back
Fold the binding to the back of your quilt and pin or clip it in place every 3-4 inches. I love using Clever Clips for this. As you get to each corner, use care to fold first one side to the back, then the other, so that you get a neat miter (see Photos 9 and 10). Then put a clip to hold the miter in place.


This is a great time to use either your walking foot or your stitch-in-the-ditch foot. A walking foot helps keep everything moving nicely, because there are a lot of layers involved. A stitch-in-the-ditch foot is also handy, because it can help keep your stitches neatly placed along the edge of the binding. Make sure your stitches fall right along the edge of the binding and they will disappear into the seam on the front of the quilt. As you approach each corner, keep your needle down and pivot your quilt to make a neat corner. *Tip: Take a quick peak at the back as you pivot around each corner to make sure the binding is folded correctly on the back.
Here’s a video to show the process of stitching in the ditch to attach the binding the back of the quilt:
Judy
May 26, 2021
I’m going to try your method of attaching the ends. I don’t have much strength in my hands so the clips don’t work. A thin line of Elmer’s glue and an iron to heat works just fine.