The Scrappy Mountain foundations come in five different sizes and can be purchased in our shop.
The Scrappy Mountain quilt blocks can be mixed and matched in anyway you want. Really, the sky is the limit! But sometimes that can be too many options. To get you started, I thought I would share a tutorial for the Scrappy Mountain Mini Quilt I made. It measures 20” x 24” and would make a cute quilted wall hanging. If you want something larger, make four of these mini quilt tops and sew them together to make a small 40” x 48” throw. This would be a great size for a baby or toddler quilt. Need something larger? If you make 9 of them they will make a 60” x 72” throw.
Just have fun and play around with these mountains. That’s the goal!

Scrappy Mountain Mini Quilt Tutorial
Size: 20” x 24”
Make:
(6) 1” x 2” Scrappy Mountains
(5) 2” x 4” Scrappy Mountains
(6) 3” x 6” Scrappy Mountains
(2) 4” x 8” Scrappy Mountains
(2) 5” x 10” Scrappy Mountains
* Patterns for the Scrappy Mountains can be purchased in my shop.
Cut:
(5) 1 1/2” squares
(2) 1 1/2” x 2” rectangles
(4) 1 1/2” x 3 1/2” rectangles
(1) 1 1/2” x 4 1/2” rectangle
(2) 2” x 4 1/2” rectangles
(1) 1” x 20 1/2” strips
(4) 2” x 20 1/2” strips
You will also need 2/3 yard fabric for the backing and (3) 2 1/4” x WOF* strips for the binding. (*width of fabric)
Assembly:
-
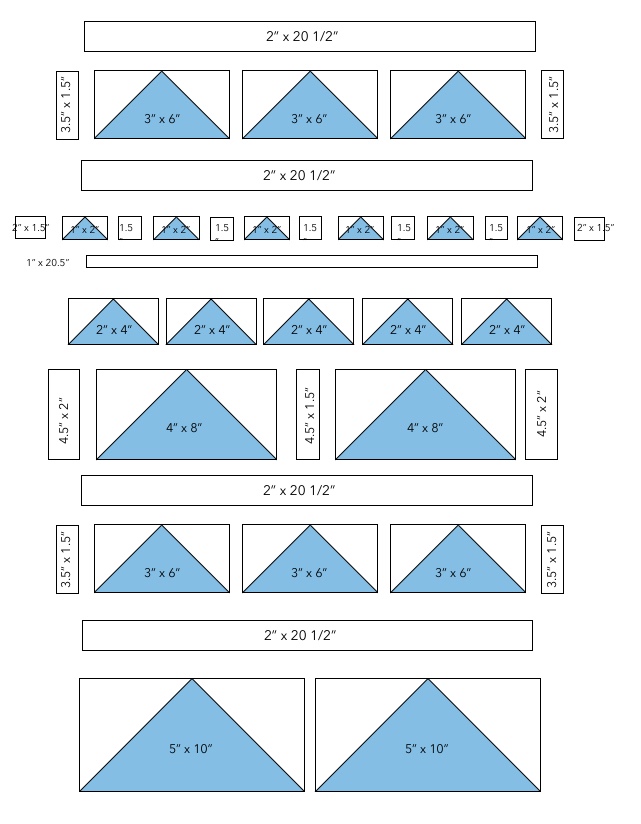
Layout all Scrappy Mountains and background pieces as illustrated.
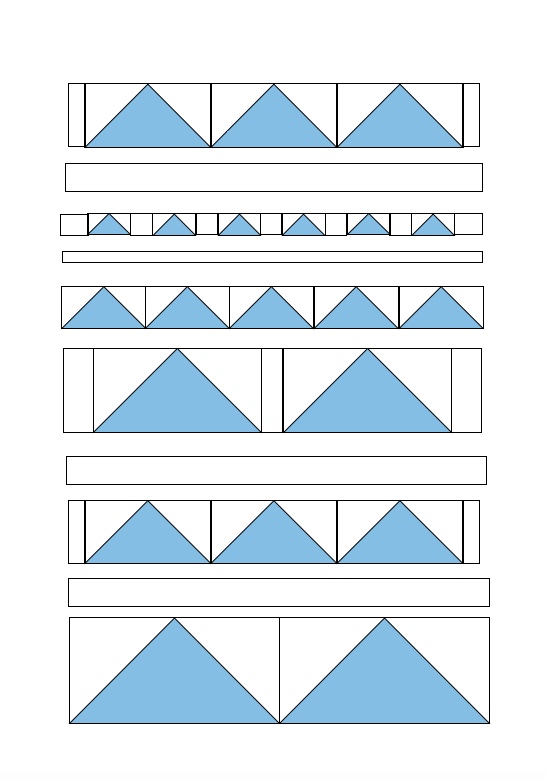
2. Sew the Scrappy Mountains and background spacing strips together into rows. (Ignore the long strips for now.)
3. Press. When two Scrappy Mountains are sewn together, press the seams open. When a Scrappy Mountain is sewn to a background strip, press towards the background strip.
4. Sew the Scrappy Mountain rows and the long 20 1/2” strips together. Press towards the strips.
5. You’re done!
Quilting
Now you can baste and bind the quilt as desired. I quilted my mini with straight line quilting. I played with the line direction and want to show you how I did that.
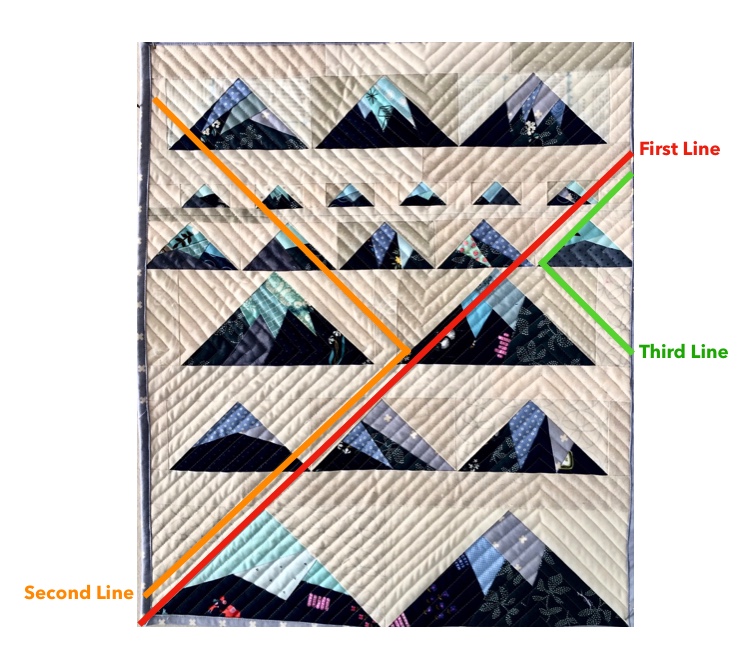
The first thing I did was mark a line with a disappearing fabric ink pen. I started in the lower left corner and went up through the quilt at a 45 degree angle. Then I stitched on the line.
Next, I marked two more lines. I had one branch off midway through the quilt to the left at a right angle to the first line. The next went down to the right near the last quarter of the first line. (You can change the placement of these lines so they are pleasing to you. They don’t even need to be at right angles!)
After marking the secondary lines, it was time to sew again. I sewed parallel to the first line and, when I hit the second marked line, I stopped, needle down, rotated the quilt 90 degrees, and sewed on the second marked line. I did the same for the third line.
After the major lines were sewn, I just filled in the rest of the quilt with straight line quilting. I sewed parallel to the previous stitching lines and used the side of my walking foot as a guide.
Give it a try! It’s a fun way to do straight line quilting and is slightly less boring than all parallel lines. :)
The Scrappy Mountain foundations come in five different sizes and can be purchased in my shop.


Leave a comment (all fields required)