Mask instructions
This blog post walks you through how to quickly make a mask for your child or grandchild out of our new mask fabric panels. With Halloween approaching and kids needing to wear masks for daily activities, it’s fun to have a mask with a little personality. Each mask comes with matching ears and a matching back panel. Studies have shown that two layers of quilters cotton is as effective as a surgical mask. Safe and fun!
For other mask instructions check out our other blog post:

Supplies you need
- Cut out one mask front and back

2. Place right sides together and sew the top with a ¼” seam allowance
3. Sew along the bottom leaving the opening between the two marked triangles

- Cut two 6” pieces of elastic (for smaller children, use 5”)
- Place elastic in between the front and back of the panel tucked into the top and bottom corners and pin. Repeat for the other side.


-
- From top measure down 1” and 2.25” and mark at both
- From bottom measure up 1” and 2.25” and mark

- Pinch and fold the 1” mark to the 2.25” mark and pin in place (repeat for top and bottom and both sides)

- Top stitch around entire mask to secure pleats and close the opening

Tips and variations:
*Use bias tape to attach a pipe cleaner to the top of the back panel of the mask before stitching together to create a nose piece to help fit the mask more closely
*Attach buttons to a headband to loop elastic around instead of ears
*Use longer elastic to go around entire head instead of around ears
*Use two face characters back to back to create a reversible mask!

Ear Instructions
- Cut the matching ears for your mask
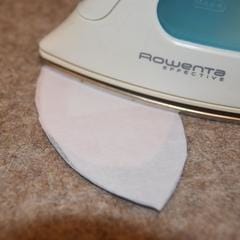
- Take heat and bond and trace your ear pieces onto it.

- Cut around ear pieces with head and bond
- Iron heat and bond to back of ears
- Take a headband and fold the ears wrong sides together

- Use an overlock or zig zag stitch on edges to stitch ears together

Tips and variations:
*Ears have seam allowances so you can stitch right sides together and turn them, but some of the smaller ears this is more difficult
*You can stuff the ears with stuffing instead of using head and bond to create the stiffness Or you can use a piece of cardboard to make the ears stand up
Stay in touch and Show us what you've made:
Instagram: @sewingbysarahstore
Facebook VIP Group: https://www.facebook.com/groups/sbsvip
Download your FREE Presser Foot Quick Guide Here:


Leave a comment (all fields required)