It's week 3 of our Storm at Sea Quilt Along: Let's sew! Now that you have your fabric pieces cut and stacked in rows of size and shape, let's begin sewing them into the smaller blocks to create your quilt.
Here is a little video overview of the piecing process before you get started!
I have learned that the secret to good piecing is not only precise cutting, but also excellent ironing. I use spray starch on every block before trimming it. Many people use steam, but did you know that steam can stretch your fabrics? A good, heavy starch will really flatten those seams and stiffen the fabric for trimming.
I use a heavy wool pressing mat for ironing. It is like pressing both sides of the fabric at the same time.


Also, I just purchased a Teflon Iron Cover from SewingBySarah.com. I can’t wait to try it! I can’t tell you the number of times I have scorched fabrics. It’s heartbreaking when it is one of your quilts. So, I’m excited about this product.
Try one square at a time, before doing all of the same piece. Check to see if it looks right before sewing the others. I recommend that you make the first final block and complete it before moving on to make more.
Another thing that I suggest is that you use the exact same thread in your bobbin as in the needle.

Do you have a design wall?I do not.However, I’ve found something that I think works just as well. I have a quilt hanging in our guest room. When I am piecing a new quilt, I simply turn it around, facing backwards. Then I can pin my finished blocks to it. Not only will this keep things organized for the next step, (sewing the blocks into rows, and then the rows into the finished quilt top) it also allows me to visualize the finished quilt. I like to stand back and take a look at the project as at will look hanging. Sometimes I decide to change a few of the colors. To be honest, I always end up changing colors around. So this system works well for me.
Let's get sewing!

Using ¼” seam, with RST, sew 2 triangles to opposing sides of a 2-1/4” colored square. Press. Next sew the other 2 triangles. Press. Trim to 3” square.
Make the larger square the same way, with a background square in the center. Add the colored corners. Trim to 4-1/2” square. Add 4 large background corners. Press and trim to 6” square.
I use a magnetic seam guideon my sewing machine so that all of my seam are exactly the same size. You can find one on SewingBySarah.com

You will need to make a total of 40 of these diamond blocks. There are 2 in each final block, as well as a row of them along one side and the bottom.
Using ¼” seam, with right sides together (RST), sew 2 opposing sides of the triangle corners. Press. Then add the other two corners. It will look “wonky” until you trim it.
When pressing the small blocks, press from the center out.
Trimming your small blocks:

The most important thing when trimming the small blocks is that you leave ¼” overlap beyond the points. Otherwise you will lose the tips of the corners when sewing the blocks together.
Measure from the center of your 3” block. This way, you know it will be in the center after trimming. However, before you trim one side, be sure there is still a ¼” overlap on the opposite side. Trim both sides, then turn and trim the other two sides in the same way. Trim the 6” squares and the diamond blocks this way as well.
Troubleshooting: Adjusting your seam allowances.
So, how is it going? Are your blocks working out? Do you have that ¼” overlap along the sides? If not, here is what you can do:

If your interior square ( in this case a background square) is too large, and you do not have that ¼” overlap when trimming it to 4-1/2” square, adjust the width of your seam a fraction larger. I did this when making this portion of this block. I adjusted it to a 3/8” seam. Still, it was large enough to trim the square to 4-1/2”. Make a note of the new seam width and use it for all of the others when making the 6” square block. I only adjusted my seam allowance for this one step of this block.

If your interior square is too small, you will have too much area around it after trimming it to the correct size (in this case 3” square). Your square will appear to float. Adjust your seam allowance smaller.

If your diamonds look like this, with not enough area along the sides for a seam allowance, slide the triangles closer to the center so that they overlap.
What if one of my small blocks has a seam allowance that is just a fraction less than ¼”?

As you can see, I had to rip this seam out. The tip of one corner was cropped once the blocks were sewn together. So.. here is what you can do. Pin the seams at the spot where the points meet. That means sliding the piece with the smaller seam allowance down a bit. Pin that spot and check it. Now you can still use that ¼” seam, but one side will have a smaller allowance. This only works when it is just slightly off. And if you do this, I recommend that you use Frey-Check glue for fabrics on the seam, or run a stay-stitch along the edge.
Ready to begin sewing those blocks together to make the final blocks?
Lay out four small blocks to make up the first final block. Refer to the list for each block color. Sew the 3” square to the horizontal diamond block. Try to match the point of the small square to the point of the diamond. Pin in place.

Next, sew the 6” square to the vertical diamond. Match the point of the square to the point of the diamond.

(Please note that my diagrams do not always show the full ¼” overlap.)
Now just sew the two pieces together to make the final b lock.

Match the seams. Then trim these to 8-1/2” square. Be sure to leave a ¼” overlap along the sides. Pin this spot before sewing.
Photo Gallery
This is the backside of my 3” square.
I find it best to iron from the center out.

I use a ¼” seam foot and magnetic guide from Sewing by Sarah.

These are photos of making the 6” square. Add the opposing triangle corners, press, then add the other 2 corner triangles. Press and trim to 4-1/2” square. When trimming, I saw that one edge is slightly less than 1/4”. No worries. Apply some Frey-Check glue for fabrics, or stay-stitch the edge. Then sew the background corner triangles as if it were the full 1/4”seam allowance.
This is my finished 6” square.

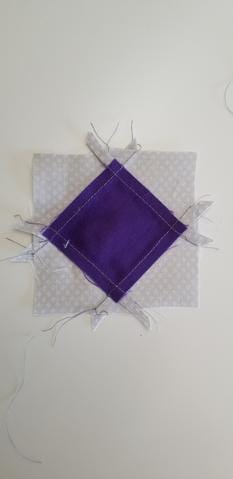
Making the Diamond Blocks

Making the diamonds block are fun. These photos show the positioning of the corner triangles to the diamond background piece.


Press the seams from the center out. It will look a little “Wonky” until you trim it.


Sew the top 2 blocks together.

Sew the lower 2 pieces together.

Sew the final seam.

This photo shows all of my “Crib Quilt” squares pinned to my quilt wall.
Keep in mind that if you are making the “Crib Quilt” design, the boarder rows of 3” squares and diamonds can be any colors that you choose. Just be sure that you have enough LFT and RFT pieces to make the interior stars. This is a great place to use up your scraps.

I like the “Scrappy” look along the boarders. Because I had enough fabrics, I decided to group the colors together in shades of blue, yellow and orange, pink or greens.
Have fun Piecing!
Join us next time for the final steps in finishing this quilt.
Don’t forget to post your progress as well as any questions on the SewingBySarah VIP page on Facebook or the Instagram #StormatSeaQuiltalong. I’d love to see your squares and fabrics.
Here are a few items that I recommend for Quilt-Along #4. We will be sewing the blocks into rows, and the rows into the final quilt top. We will also baste the quilt top to batting and a back fabric, and quilt it.
I love the teflon iron cover, heat erasable fabric pens, and Free Motion Quilting Essentials Templates with grips the bottom.
Also, I recommend Quilters Dream 100% Cotton batting because it is the thinnest, lightest batting that I have ever found. Also, you will need a back fabric of at least 1-1/4 yard, (buy more if you want to add borders to make a larger quilt).


Leave a comment (all fields required)