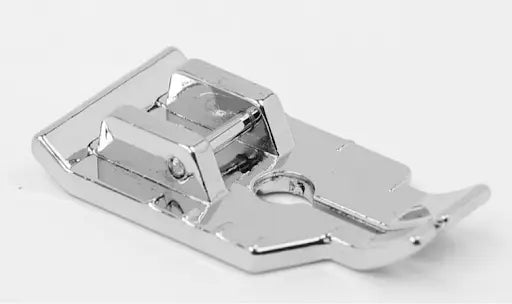
Arguably, the ¼” (quarter inch) foot and the ¼” foot with a guide are a machine quilter’s best friend. Both of these feet (which are physically the same, except for the extended seam guide) will help you create PERFECT ¼” seams on any project, and we all know how important that precision is!
This video walks you through how to use a 1/4" (quarter inch) presser foot to sew straight and keep those seam allowances even.
1/4" Foot
¼” Foot with Guide
Let’s look at the foot--the back is wider than the front, and the toes are asymmetrical. The right toe is wider than the left, and the outer edge of that right toe is exactly ¼”. That’s the edge you’ll line up your fabric with. If you’re using the ¼” foot with a guide, you’ll line up your fabric with the guide.
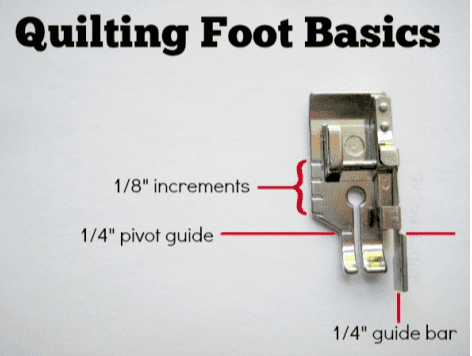
You’ll notice there are raised markings on both the right and left sides of the foot--on the right side, those markings are spaced at ¼”; on the left ⅛”. These markings indicate where to pivot to maintain that perfect ¼” ( or ⅛”) seam allowance when turning corners.
When using your ¼” foot (with or without the guide), make sure your machine is set to the center straight stitch setting, place your fabric under the foot, aligning the edge of your work with the edge of the foot (or the guide) and stitch away! You will be thrilled with your finished seams, and how easily your quilt pieces go together!
DOWNLOAD OUR FREE PRESSER FOOT GUIDE HERE!!!!
Check out another video tutorial:
Stay in touch and Show us what you've made:
Instagram: @sewingbysarahstore
Facebook VIP Group: https://www.facebook.com/groups/sbsvip


Diane Pike
June 01, 2023
The slot my foot snaps into is too large and the foot slides back and forth in the slot. Yes, I have the right foot for my machine. Does your foot snap in tight?