This reversible tote bag is an easy sewing project that will be a gift on it's own, or as an added reusable gift bag for your friends and family. This sewing tutorial walks you through the simple project and the tote bag is even reversible!

When I lived in Japan I was much impressed by the custom of "furoshiki," or wrapping gifts with a square of silk fabric. The gift would be placed in the middle, and the fabric gathered around the sides and tied in a carry-able knot on top. As the recipient, you kept the fabric and would pass it along on the next gift-giving occasion.
I tried this once or twice, but it met with a lot of questions, and since it wasn't quite our American tradition, I stopped doing this. Maybe though, with concerns about the one-use practice of gift wrapping, it's time to revisit this tradition, but with a spin--a gift tote bag!
"Wrapping" gifts in totebags makes complete sense, as EVERYONE can use a tote. And it's easy enough to change the tote sizes, based on fabrics you have on hand. Let me walk you through a simple tutorial for a quick and easy reversible, re-usable tote.
Supplies:
- 1/2 yard of two coordinating fabrics
- 1/2 yard x 44" of interfacing
- 50" or so of 1" cotton or nylon webbing
- coordinating thread
Notes: I chose the 1/2 yard of fabric as this is an easy cut, and it makes a considerably large tote bag. It's perfect for a quick trip to the grocery, or for a child, she can use it to pack for sleepovers or a trip to the library. That being said, you can apply the same process to ANY size fabric you have.

How To:
- cut the fabric and interfacing into equal sizes. Make sure you cut off the selvedge of the fabrics. My finished size of my two half yard cuts was 17" x 42". By the way, directional fabric totally works for this pattern.
- Iron on the interfacing to one of the pieces of fabric.
- Fold the fabric in half, wrong sides together. Clip with Clever Clips or pin together.

- With a 1/2" seam allowance, sew the two short ends and one long end closed, pivoting in the corners. (and yes, you will be sewing the folded side.)
- Repeat for the 2nd piece of fabric.
- With a ruler, measure in 2" from the side and bottom seam lines AT THE BOTTOM OF THE BAG (not the open top).

- Cut out the corner squares

- Return to your machine, and reinforce the side and bottom seams at the corner edges
- Cut your seam allowances by half.
We are now going to box the bottom of the bag.
- Open the corner cut outs (it will look like a wide-open mouth).
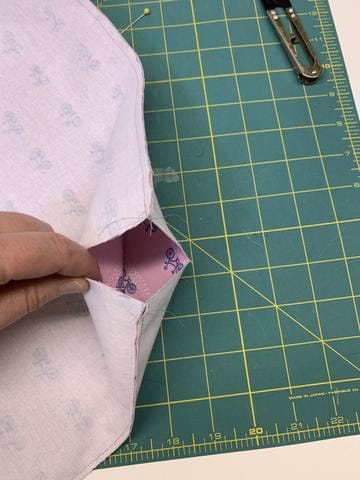
- Match and nest the two seams. When you nest your seams, pin at the 1/2" seam allowance so they match up perfectly.

- Pin and sew at 1/2" seam allowance.
- Repeat for the other 3 corners.

(see--perfectly matched seams!)
Now we'll sew the outer bag to the inner bag, and add the straps.
- At the open top of the bag, mark (with your erasable marking pen) where your straps will go. My bag was 21" across, so I marked at 7" and 14". Clip the straps to the right side of the bag.

- With right sides together, slide the interior bag over the exterior bag. Make sure the straps are in between the two layers.
- With a 1/2" seam allowance sew around the perimeter of the bag, leaving about a 4" gap between where you start and stop. When you get to the straps, sew right over them, then reverse stitch over them and then sew over them again. This will keep them securely in place.
- Turn the bags right-side out, using the unsewn gap along the front.
- Press the top edge of the bag, giving it lots of steam. When you get to the unsewn gap, press those seam allowances to the inside.

- Top stitch at 1/8" from the edge of the bag.

Voila! You've got your reversible gift tote-bag! To make it even more festive, tie a bow using a strip of the same fabric.


Stay in touch and Show us what you've made:
Instagram: @sewingbysarahstore
Facebook VIP Group: https://www.facebook.com/groups/sbsvip


Leave a comment (all fields required)