Welcome to the Celebration Slices Quilt Along! We are so very glad you joined us! This week we cover what you will need to get started, best practices plus a video on paper piecing!!
Celebration Slices is an easy paper piecing pattern, but before we get into the nitty gritty of beginning to paper piece, let’s make sure you’ve gathered all of your necessary supplies. You will need:
-
Celebration Slices Pattern
- The pattern has three different projects to choose from – a Birthday Cake (or just a cake to celebrate, well, whatever!), a Pumpkin and a Christmas Tree. Which will you make for the Quilt Along? Decisions, decisions!
- You can purchase it here:
-
https://sewingbysarah.com/products/quilt-along-pattern-by-tammy-silvers
- Fabric
- Of course, what fabric you need and how much of each color will depend upon your project. We will get into fabric prep in just a bit.
- Copies of the paper piecing pattern
- Most paper piecing patterns come with a master copy. You will want to make copies of the master for your actual project. I have some tips on working with your copies so you have the best possible experience paper piecing your selected project.
- Make all of your copies on the same machine to avoid any sizing differences.
- Pressing cloth
- This can be a large rectangle of muslin or other plain fabric. You will use it during the project to protect your ironing surface from ink transfer. You will be pressing your paper piecing pattern – paper side down. Trust me – you’ll be so glad you used this!
- Here's a brief overview of Pressing Cloths!
- Rotary cutter, ruler and mat
- No big surprise here – make sure you have a sharp blade (hey, when is the last time you changed that blade???) in your rotary cutter. Clean off the mat and pull out your favorite rotary ruler. I like to use a 24” long ruler for my initial large cuts and then a shorter ruler for the smaller trimming.
- While not required, it is awesome to have an Add A Quarter ruler. Don’t have one? Grab some card stock or a post card! You’ll use for folding to trim.
- Sewing Machine
- I think you knew that – but I want to be complete!
- Iron
- I’m often asked if I use steam – and the answer is a resounding yes! I’m also a fan of Best Press and Flatter – but if you are going to be fusing your applique shapes on at the end, I’m going to discourage you from using those products right now.
- Fusible of choice
- Steam-A-Seam 2 Lite is my preferred paper backed fusible. On the plus side, you can print or trace your templates directly onto the non-release side of the fusible and put on the wrong side of your applique fabric before cutting out your shapes. It fuses wonderfully, and you won’t have to edge stitch your appliques if you don’t want to. On the minus side, if you don’t fuse completely, and let it cool, it can gum up your needle.
- Odif 606 spray is my non-paper fusible of choice. On the plus side, no gumming up your needles! On the negative side, you’ll need to trace your applique shapes onto template material (card stock or template plastic), trace to the wrong side of your applique material and then cut out before spraying. Oh – and you’ll want a “spray box”. I use a large shipping box for this purpose.
- Decorative thread
- If you will be machine or hand stitching around your applique shapes, you’ll want coordinating or contrasting threads for the embellishment
- Quilting thread – I’ll talk more about this in the finishing stage, but go ahead and think about what quilting thread – and what color – you will want to finish your project.
Whew – that’s the broad overview of the materials list. Now let’s talk about some best practices for paper piecing.
Best Practice #1
Read through the entire pattern. Yes, the whole thing. From the top of Page 1 to the very last sentence on the last page. Actually, this is a good idea for ANY pattern.
By reading through the entire pattern, you can familiarize yourself with the writing style, with the steps in the process (so you know what to expect), and the general layout of the pattern.
Best Practice #2
Make a sample block. I mean it. Grab some fabric scraps, or fabrics other than what you are using for this project, and make a sample block.
When you make a sample block, you will have a better understanding of HOW the block is put together. And let’s face it – we all sew just a bit differently. When you make your sample block, you can determine if there are any adjustments you need to make to get the best block possible.
Best Practice #3
Prepare your fabric. If the project you are making is going to be used – ie it may need to be washed at some point – then you might consider prewashing your fabric. Prewashing will remove excess dye, which will minimize color bleeding. Prewashing will also help with shrinkage so your final project will stay nice and smoother after washing.
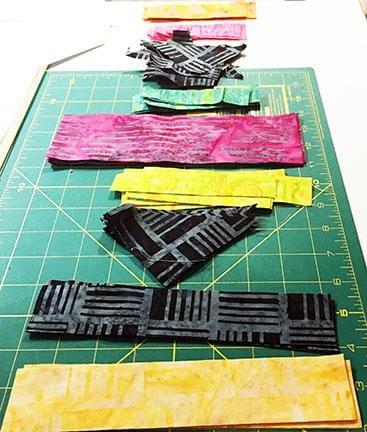
For paper piecing, I recommend precutting and stacking your fabric pieces in the order they will be used. This makes it super easy to work through the paper piecing units. Here is a picture from a paper piecing project I did. My fabrics are all already cut to size (per the pattern), and laid out in the order I will be piecing them. It really speeds up your piecing!
Best Practice #4
You’ve already made your paper piecing pattern copies. Pull them out and write your color placement on each one. For many of my paper piecing patterns, I have already marked the pattern with the color placement. But because you have three different options of project in Celebration Slices – and because your color placement will vary by row for each project, no colors are marked.
Use the color diagrams on Page 3, 4 or 5 (depending upon your chosen project) to determine color placement for each row. Again, write on your paper piecing patterns. You could even use colored pencil, pen or marker to make it even easier!
Best Practice #5
Shorten your stitch length. With paper piecing, eventually we will be removing the paper from the back of the stitched blocks. We don’t want our stitches to come out. So reduce your stitch length. My machine defaults to 2.2. I reduce the stitch length down to 1.8, or approximately 14 stitches per inch. You can select a shortened stitch length that suits you – but don’t go so small that you can’t get a seam ripper in there. Trust me!
We will talk more about removing the paper, as well as joining units, in the next session.
MORE INFORMATION ON PAPER PIECING
New to paper piecing? No worries! I have a written BRIEF paper piecing tutorial available here: https://media.rainpos.com/2236/super_simple_paper_piecing_tutorial.pdf.
Yes, it is also in the pattern. You can use it to practice and become comfortable before beginning your project!
Need a bit more? I did a short video on getting started with paper piecing!
Last piece of advice: have fun with this. Relax. Give yourself permission for it NOT to be perfect (trust me, only YOU will know if it isn’t!).
Here is Tara making this celebration quilt demonstration how to use an "Add a Quarter Plus Ruler"
Next time, we will discuss joining units and removing papers. In our last session, we will talk about finishing the project – adding borders, quilting and adding motifs.
Here are links to the rest of the posts:
Thanks for joining us! I can’t wait to see everyone’s Celebration Slices projects!
Please remember to join our Facebook Group:
www.facebook.com/groups/sbsquiltalong/
Tag your progress on Instagram with #CelebrationQuiltAlong so we can see your work!


Leave a comment (all fields required)